Harrison FleX-10 Review: Bringing Big Console Sound to Your Home Studio


When we record "in the box", the cleanliness of digital is fantastic, but we often miss that analog "thickness" when shooting.
Harrison, a legendary brand for analog consoles (think of the historic records recorded on their consoles), has released a desktop USB-C audio interface that aims to solve exactly this problem: the Harrison Flex-10 .
I've looked into it thoroughly, and today we're looking at why this 32-bit, 192kHz card could be the missing piece for anyone looking for character right from the recording stage.
1. Preamps and the Magic of H-DRIVE
At the heart of this board are two high-performance Harrison microphone preamps, offering 63dB of gain.
But the real killer feature is called H-DRIVE .
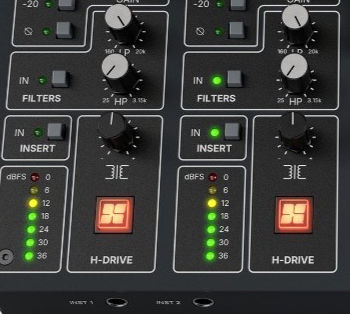
This is a dedicated transformer circuit, activated via a large illuminated switch on the front panel.
What exactly does it do? It allows you to push the input signal toward harmonic saturation of the transformer, while simultaneously adjusting the output level. The H-DRIVE switch changes color (from amber to red) depending on how heavily you're saturating the transformer.
If you want to record a vocal or DI bass and instantly stamp some true analog character on it, this is the perfect way to do it.

2. Harrison Historical Filters
Another absolute gem derived from the mixing desks: on each channel you have the classic Harrison High-Pass and Low-Pass analog filters available.
High Pass Filter (HPF): Variable from 25 Hz up to a whopping 3.15 kHz.
Low Pass Filter (LPF): Variable from 20 kHz down to 160 Hz.
The key thing is that these filters act before the saturation stage. This allows you to sculpt the sound perfectly (for example, removing all the mud in the low end) before sending it to saturation in the transformer.
3. Connections and Routing (Designed for Pros)
The routing is real studio-grade:
Two XLR microphone inputs on the back with 48V Phantom Power, -20dB Pad and polarity inversion (Ø) for each channel.
Two balanced line inputs on the rear and two convenient instrument (Hi-Z) inputs on the front panel for guitars and basses.
A balanced insert point for each channel . If you have a hardware compressor (e.g. an 1176 or an LA-2A), you can physically insert it into the chain via the rear panel and activate it with the dedicated "INSERT" button on the front.

4. Master Section, Listening and Converters
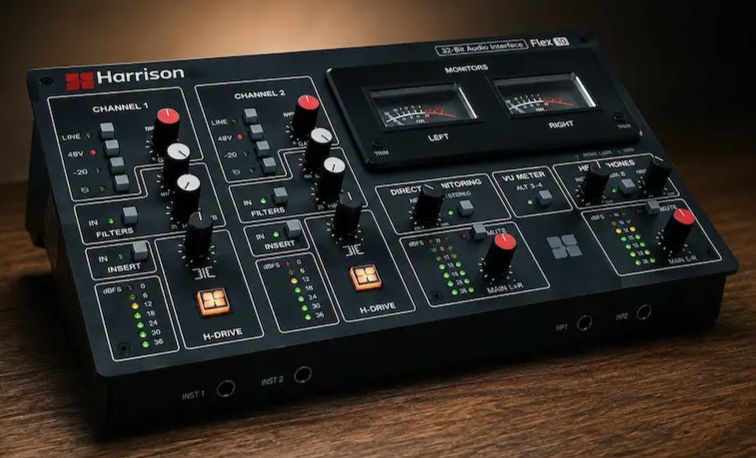
On the master we find two large and beautiful analog VU Meters to monitor the output levels, equipped with independent calibration trims (Left and Right).
The conversion is entrusted to new generation 32-bit and 192 kHz chips, guaranteeing an immense dynamic range of 119.5 dB on the balanced outputs.
The listening management is excellent for recording sessions:
We have dual balanced monitor outputs (MAIN LR and ALT 3-4) with separate volume knobs and Mute buttons.
There are two independent headphone outputs on the front panel.
Headphone 2 (HP2) has a dedicated switch for listening to the ALT 3-4 output mix, perfect if you need to send a separate, customized listen to a singer in the booth.
FAQ and Practical Scenarios: How to Get the Most Out of the FleX-10
1. Can I use the FleX-10 to pass my mix through a hardware analog machine (e.g. a stereo compressor)?
Absolutely, thanks to the multiple outputs. The trick is this: from your DAW, set the output of your Master Bus to the ALT 3-4 outputs of the FleX-10. Physically connect the rear ALT 3 and 4 outputs to the inputs of your analog machine. Take the outputs of the analog machine and feed them back to the LINE 1 and 2 inputs of the FleX-10 (remembering to press the "LINE" button on the front channels). In the DAW, create a new stereo recording track that takes the signal from inputs 1-2 and sends it to the Main 1-2 output. This way you can conveniently monitor the processed result from your speakers connected to the MAIN LR.
2. How do I set up a perfect vocal recording with zero latency headphone listening?
Connect your microphone to the XLR input (Channel 1). If it's a condenser, activate the 48V . Press the IN button in the Filters section and turn up the HPF a bit to cut out rumble and background noise from the room. Adjust the level with the red Gain while keeping an eye on the LED meter. Want color? Turn on the H-DRIVE and adjust the amount of saturation. To listen, plug your headphones into the HP1 jack. Use the DIRECT MONITORING section: turn the MIX knob to balance the microphone's direct input ("DIR", zero-latency) with the backing track return from your DAW ("USB"). Make sure the STEREO switch is not pressed (leave it in mono mix mode), so you'll hear your voice perfectly centered.
3. I need to record an acoustic guitar in stereo with two microphones. How do I manage the listening?
Connect the two microphones to inputs 1 and 2. Adjust the levels so that the meters are balanced. The real trick here is in the monitoring: in the Direct Monitoring section, press the STEREO button. This function automatically sends input 1 to the left side of your headphones and input 2 to the right side. This way, you can hear the true, wide stereo image of the acoustic guitar as you play it, instead of the usual annoying mono signal overlapping in the center!
4. What if two preamps start to feel too small for me? How do I expand it via ADAT?
The rear panel of the FleX-10 features two optical ports: ADAT IN and OUT . These ports allow you to add up to 8 bidirectional channels. Simply purchase an 8-channel preamp with an optical output and plug it into the FleX-10's ADAT input. When the two machines are connected and "talking" at the same sample rate (with their clocks synchronized), you'll see the green ADAT LOCK LED light up solidly on the Harrison's front panel (if it's flashing, it means there's no signal or the cable is disconnected). You'll then have a total of 10 inputs in your DAW, ready to record an entire drum kit!
The Verdict
If you're looking for an interface that's not just a transparent "paper pusher" to your computer, but a true tone-shaping tool during recording, the Harrison FleX-10 is a machine worth serious consideration. It forces you to make decisions about the sound from the very first moment, exactly as was (and is) done in large analog studios.

👇 Do you want to bring it to the studio?
I'll leave you the link to see the updated price and availability on Thomann. Using this affiliate link is a great way to support my work and the free content I bring to the channel, at no additional cost to you!
Hardware and Outboard: The Last Hurdle
You've chosen the right interface, learned how to use H-DRIVE and plugins to add character, and finished a mix you're proud of. You've done everything possible in the box.
However, when it comes to the final master, the software still struggles to replicate the non-linear, chaotic, and explosive behavior of real electricity pushed to the limit on dozens of tracks simultaneously.
That's why I built VDSS Studio around an extreme hybrid.
When you entrust your finished tracks to our Online Mastering or Stem Mastering services, your audio literally comes out of your computer. Your stems are physically summed in our Neve 8816 , passing through real transformers to get that uncontrollable low-mid thump.
Space and harmonic punch are handled by our Vari-Mu Mastering Compressor , while for more organic projects, we press the master directly onto our fully restored MCI JH25 24-track tape recorder .
All this richness is finally surgically recaptured in digital form through the Burl B2 converters, famous for their transformer input stage.
The result? The detail of your digital mix, inexorably fused with the weight, breadth, and density of top-of-the-line hardware.
Stop playing fake. Get your music out of the box.
